Some Slight Revisions

It looks like the randomized Kara portrait quest won’t be programmatically prohibitive — and I like it, so I’m running with it.  Lance’s Letter will spoil where Kara’s portrait will be found (see below) — however, the player is on their own with the location of the Magic Dust, which is also required.  Maybe Ishtar can spoil that location as a reward for completing the Angel Village dungeon.

Secondly, in the spirit of my last post (i.e. refraining from adding new stuff to the game, when possible), I’ve decided to get rid of the sea captain who offers passage from Inca Ruins.  I’m not doing away with sea travel, however.  Let me explain:

So, I’ve always felt kind of bad for Seth, who turns into a sea monster with little explanation or necessity, and then proceeds to fade into obscurity nary to be recalled ever again.  Seems like an ignominious end for our bespectacled friend.  So, as an homage to Seth’s mysterious transformation, I would like to use him as our key to sea travel — i.e., he can pick us up in South Cape and take us to any of the sea-accessible locations previously discussed.

This quest is unlocked with Lola’s Letter.  Again, allow me to explain:

So, at the start of the game, Erik can be found on the docks at South Cape.  Apparently he can signal to and communicate with Seth (in sea monster form), however as he does not know Morse Code (which was Seth’s only method of communication in the vanilla game after his transformation), he cannot understand what Seth is saying, or say anything in return.  In Lola’s Letter (which in vanilla is procured from a man in Dao), she states that she’d heard of Will’s need to learn Morse Code; and since Bill knows the code, she had him write up an explanation which she included in her letter.  Thus, finding and reading Lola’s Letter allows the player to learn Morse Code, subsequently allowing the player to communicate with Seth (via Erik in South Cape) and hitch a ride with him to anywhere in the world accessible by water.

Is it weird?  You bet.  Do I love it?  I kinda do.  Not only does it make use of the game’s existing lore, it also gives a significant role to every NPC in the core cast of characters:

  • Kara is trapped in a painting, which can be found in one of five locations.  Rescuing her (as well as collecting the needed Mystic Statues) gains you the Firebird Attack, which is required to beat Dark Gaia and complete the game.
  • Lilly can be found in Itory and will join you in your pocket if you bring her Necklace back, unlocking the coffin item in Seaside Palace.
  • Neil can be found in his cottage and will fly you around in his airplane if you can restore his knowledge with the Memory Melody.
  • Lance is with his father in Watermia and grants you an item, as in vanilla. He also indirectly helps by writing you a letter informing you of where his father saw Kara’s portrait.
  • Erik hangs out on the docks in South Cape, where he can act as your go-between with Seth.
  • Seth, in sea monster form, can take you around the world, provided you know Morse Code.

I think I’m finally happy with how this is turning out.  Not too late for feedback, however.

Subsequent to having nailed down some of the significant game mechanics (and have largely verified that they can be feasibly implemented), I will likely not be updating this blog much as I spend most of my time doing the tedious work of implementing these mechanisms.  I’ll still be around to garner feedback, of course, which is more than welcome!  I may also do some development on my Twitch stream, so feel free to give me a follow: https://www.twitch.tv/dontbagume

The Focusing Power of Feedback

I love feedback on this project. I feel I have a strong vision, but I’ve always done best in life when I have people who are willing to challenge my ideas and collaborate with their own. Two heads (or three, or five) are better than one.

One of the heads that keeps popping up (in the best possible way) is SmashManiac, who often reaches out via Discord to share his reactions to the ideas I share on here. The discussion that ensured after my previous post was very much appreciated, and it’s caused me to ask some why-level questions of myself concerning this project.

I’ve come to realize that I’m building more than a randomizer – it’s becoming more of a ROM-hack that then gets randomized. I guess it makes sense for this to be the case, since the vanilla game is too linear to be much fun as a randomizer. The overwhelming initial sentiment I get from folks who hear I’m writing a randomizer for IoG usually falls somewhere on the skepticism spectrum, probably for this reason.

So I’ve had to think outside the box from the beginning, and it’s been a fun challenge, both methodologically and artistically. It also means it’s been difficult to nail down exactly what I want the game to be. Which, full circle, is why I appreciate the feedback so much.

So, all that to say – I’ve made some changes to my approach on some of the elements of my last post. I still want to implement the modes of travel in order to open up the world and make randomization feasible and fun. However, I’d like to take more seriously the challenge to stick to (and find uses for) the items in the vanilla game.

So, with that in mind, here are some changes in how I’m thinking:

First, no new items – so, instead of using the Blue Journal to open up air travel, I think I’d rather use the Memory Melody – as in, Neil has his airplane but forgot how to fly it. Also, no bag of gold for the sea captain – perhaps he would settle for some necklace stones instead. Perhaps he lost them and they have sentimental value. Or, better yet, ditch the imaginary captain and make it Lance, who has access to his explorer father’s shop – he misplaced his gift for Lilly and feels broken up about it, and will help you out with sea travel if you can track it down for him.

For the remaining unused items (both letters, magic powder), I would like to try implementing a quest to save Kara – we need her, after all, to become the Light/Dark Knight and defeat Dark Gaia, and that’s a quest that mirrors the vanilla game, where she’s trapped in a painting. To save her, we need the magic powder, so this would be a required item – but in the spirit of randomization (and because the Angel Village dungeon is pretty boring), I want to see if it’s possible to put her painting in a random location, probably at the end of one of the non-statue dungeons – i.e. Edward’s Castle, Diamond Mine, Angel Village, Mt. Temple, or Ankor Wat. That would give those mini-dungeons (which aren’t always so mini) more purpose in the randomizer than just item farming.

Then, we can make the letters give hints as to the significant locations – i.e. one can spoil where the Magic Powder is located, and the other can spoil where Kara’s painting is.

This gives purpose to every item from the vanilla game, and doesn’t require adding new items (save those that emulate non-item events to be randomized, such as HP increases).

Thoughts?

PS: I’m also considering how cool it would be if rescuing Kara could unlock Shadow’s Firebird attack earlier in the game. Might be fun 🙂

Final Overworld Movement… I Think…

Okay, I think I’ve settled on how I want to handle movement between continents.  I wanted to find a system that was easy for the player to remember, that opened up world movement in a significant way, that utilized some of the non-progression items in the game, and that tied into the game’s lore in a decently feasible way.

Basically, I’ve added three main transportation systems to the game.  Each system becomes unlocked upon the acquisition of an item.

  • Travel by Sea (Bag of Gold).  There’s a ship’s captain who hangs out in the sea near the entrance to Inca Ruins.  Giving him a Bag of Gold (an unused item in the vanilla game) opens up travel by sea from there to the following sea-accessible locations:
    • Diamond Coast
    • Watermia
    • Seaside Palace
    • Babel Tower
  • Travel by Plane (Blue Journal).  Finding the Blue Journal (another unused item in the vanilla game) allows Neil to finally finish that airplane he’s been working on.  You’ll have to give him the journal in his cottage, otherwise he’ll never be able to leave — but once you do, he can be found in Euro and Dao.  From those three locations, he can take you to any location below:
    • Neil’s Cottage
    • Euro
    • Dao
    • Babel Tower
  • Travel by Sky Garden (Teapot).  Using the Teapot to heal the spirits of the Moon Tribe will make them beholden to you and will allow you to use their Sky Garden for transportation around the world.  You can access the Sky Garden for free from the Nazca Plains, but you can only use it for travel if you get the Teapot.  Getting the Teapot also allows access to the Sky Garden from the Moon Tribe Camp.  Since the Sky Garden is so conspicuous and the Moon Tribe wish to remain hidden, they will only drop you at sparsely populated locations where they can avoid notice, and that aren’t too overrun with monsters:
    • Nazca Plains
    • Seaside Palace
    • Angel Village
    • Natives’ Village
    • Pyramid

On top of these, there are some route-specific passages that can be unlocked with certain items:

  • Travel between Watermia and Euro (Will).  This works similarly to the vanilla game, where a Kruk is required for passage across the wasteland.  Acquiring the Will allows you to travel back and forth freely between these locations.
  • Travel between Natives’ Village and Dao (Large Roast).  A guide is required to cross the expanse between these two locations, and giving the natives some food grants you the use of their guides for this journey.

All of this is still up for discussion, so any input is appreciated.

When I started this project, it was my dream to come up with a use for every item in the game — however, opening up progression like this means that there’s still no use in the randomizer for the following items:

  • Inca Melody (unused in vanilla game)
  • Memory Melody
  • Magic Dust
  • Lance’s Letter
  • Necklace Stones
  • Lola’s Letter

As much as I’d like to make every item useful, I’ve been struggling to make use of these ones in any meaningful and rational way, and I’ll probably end up removing them from the item pool and adding in some more herbs, Red Jewels, or ability upgrades.  If anyone has any suggestions for how these items could be used, let me know in the comments.

Switches get Stitches

Another breakthrough regarding the architecture of the game. This is a huge one. (That’s what she said.)

So, I knew that in order for this to work, I would need to figure out how switches work in the game. A switch is a flag that gets set as you complete progression events, so the game knows at a glance which events have been completed and thus should not be triggered again. I want to be able to set many of these switches on a new game file, essentially granting the player access to an end-game state and allowing one to progress through the game without annoying cutscenes and progression blocks.

So, here was the challenge: Not only did I have to find out where in memory those switches were located, but I had to be able to separate the progression switches from the item acquisition switches — that way I could set the former but leave the latter. There are some places in the game where triggering an event sets both kinds of switches — for instance, when you get Lola’s melody, it sets both the switch that you got the item, plus the switch that allows you to progress past the guard out of town. I knew I needed a way to get the guard out of the way without stealing the item from Lola.

To get to the bottom of this, I looked for how save files are stored in SRAM. Turns out each save file gets a 512-byte block of code that stores everything relevant to a character’s state. Knowing my way around the RAM map, I recognized many similarities between the structure of this data block and some elements of the RAM map. This led me to discover that when a game is saved, it essentially dumps everything in RAM from 0x7E0A00-0x7E0BFB into SRAM at either 0x200 (for save slot 1), 0x400 (for slot 2), or 0x600 (for slot 3).

The last four bytes in the block are reserved for SRAM parity checks to protect against corrupted saves — if the parity bytes are off, the save file does not show up on the menu screen. I intend to get to the bottom of how exactly that parity check is made eventually — doing so would allow me to manipulate save files with complete control 🙂

This tells me that everything significant about a game’s state can be found in that block of RAM — and, indeed, this is where all of the progress-specific data have already been discovered (e.g. inventory, ability flags, player attributes, etc.). This should include the switches. Thus, I’ve been progressing through the game and, lo and behold, as I complete progression events I notice bits being turned on. For example, progressing through all the events in the first day at South Cape will eventually change byte 0x7E0A02 from 0x00 to 0xFF, with each bit acting as its own switch, as such:

  • Bit 0: opening cutscene
  • Bit 1: Enter Seth’s house
  • Bit 2: Enter Will’s house
  • Bit 3: Enter Lance’s house
  • Bit 4: Enter Erik’s house
  • Bit 5: Enter seaside cave
  • Bit 6: Talk with everybody in the seaside cave
  • Bit 7: Complete seaside cave encounter

Item acquisition switches are also in this block of code. I’ve only gone through South Cape so far, but it looks like all the Red Jewel acquisition switches might be grouped, with the map event switches in a separate place. For instance:

  • 0x7E0A1A, bit 7: Collect Red Jewel from fisherman
  • 0x7E0A50, bit 0: Collect Red Jewel from Lance’s house
  • 0x7E0A50, bit 1: Collect Red Jewel from school bell tower

This one is fun, because you can stand there in front of a location and keep resetting the switch in real time. I collected a number of Red Jewels from the school bell tower this way, just for fun 🙂 You can watch it here, in case you’re interested.

This is exciting for me, because now I can progress through the game to set event switches, but can then go back and reset the item acquisition switches. This allows me to grant the player access to an end-game state without removing any collectibles.

Now, the remaining challenge is to find out which block of the ROM code is responsible for setting the RAM values upon the start of a new game, and forcing it to set the flags I want when you start.

EDIT: At the request of Raeven0, I’m adding some more detailed documentation for developers:

  • Commands:
    • 02 cc XX – set switch, where XX is switch ID
    • 02 ce XX – clear switch XX
    • 02 cd XX AA – set map arrangement switch, AA:00 = don’t save, AA:01 = save
    • 02 d0 XX AA [BB BB] – check if switch XX is equal to value AA, jump to [BB BB] if so
    • 02 d1 XX 01 AA [BB BB] – check for map arrangement, works similar to 02 d0
    • 02 d2 XX – wait for switch XX to be set, then perform next command
  • Switch addresses in RAM:
    • 0x7E0A00-0xE0A1F – Event switches (bit by bit, 0-255)
    • 0x7E0A20-0x7E0A?? – Map arrangement switches (bit by bit, 0-???)
    • 0x7E0A40-0x7E0A4F – Chest open switches (bit by bit, 0-127)
    • 0x7E0A50-0x7E0A5F?- Item acquisition switches (bit by bit, 0-127)
    • 0x7E0A60-0x7E0A7F – Room reward switches (bit by bit, 0-255)
    • 0x7E0A80-0x7E0A9F – Defeated enemy ID switches (bit by bit, 0-255)

Shuffle Algorithms

Hey, haven’t posted in awhile – not much to report as far as actual progress. Having made rapid progress on a number of items having to do with decoding the infrastructure of the game, I have been turning my attention to a more theoretical realm – that is, the item shuffle algorithm I want to implement.

It seems like the Fisher-Yates methodology tops many lists, so I imagine my method will likely employ that at some point. However, the obvious complication involves ensuring that the shuffled item locations are conducive to the game’s logic and guarantee beatable seeds. Not having any direct experience in this arena, I find myself vascilating between two basic approaches:

  1. Do I first shuffle the items completely, then go back and make adjustments where necessary to preserve game progression? Or
  2. Do I start by generating a high-level walkthrough of each seed, and then place items in such a way that support that walkthrough?

I’m leaning towards the former, but welcome any thoughts. I’m also reading a lot of the ALTTP randomizer code for reference to see how they handle it – though that’s proven to be slow going. (Reading other people’s code is boring.)

Item Acquisition Functionality Added

I added functionality that allows passage from Moon Tribe to Euro if you have the Teapot. This is just one example of many such paths that will be unlocked as items are acquired. I also moved the Dark Space in Edward’s Prison into Will’s cell so you can get in to check the Hamlet item and escape even without the Key.

Check out a demo 🙂

https://www.twitch.tv/videos/377874376

Overworld Movement Preview

Alright, I think I’ve settled on a mechanic for getting around the overworld.  Here’s a link to a video where I give a brief demo:

https://www.twitch.tv/videos/376612622

Basically, leaving a map takes you to the overworld screen.  You then get the choice of any map location on that same continent to which you may travel. You get the same menu of choices no matter which location you leave, as you’ll see on the video.  This will certainly make overworld movement faster and more fluid — however, it comes at the cost of the snazzy map movement animation.  Again, thoughts on this point are welcome.

(I for one love the map movement animation, and would love to find a place for it in the randomizer.  My current thinking is to keep the map animation when moving between continents, but to just warp to a location when you moving to another location within your same continent.)

Here’s how I’ve grouped the continents — I call them by their Terran names for simplicity:

South America

  • South Cape
  • Edward’s Castle
  • Itory Village
  • Moon Tribe
  • Inca Ruins

Africa

  • Freejia
  • Diamond Coast
  • Neil’s Cottage
  • Diamond Mine
  • Nazca Painting

Asia

  • Watermia
  • Angel Village
  • Great Wall

Europe

  • Euro
  • Mt. Temple
  • Natives’ Village
  • Ankor Wat

North America

  • Dao
  • Pyramid

Locations not on this list (Seaside Palace, Mu, Babel) will only be accessible through in-game events — for instance, you enter a map and talk to an NPC, and that warps you to the overworld map and ultimately to one of those locations.  I’m thinking, for example, you can get to Babel by talking to Neil in Dao.  He’ll ask you if you want him to take you to Babel Tower, and if you answer yes, you warp to the animation of Neil’s plane taking you to the tower.

This essentially changes the previous concept of overworld movement.  Visually, it would look more like this:

Overworld.jpg

Any locations inside of a boundary (i.e. continent) would be accessible to and from any other within that boundary by simply leaving the map and choosing that location from a menu.  To move to another continent, you would follow the dashed lines in-game by going into the location and triggering an event (defeating a boss, talking to an NPC, etc.).  Often these events are only accessibly with prerequisite items or quests.

Thoughts?

Python Derustify!

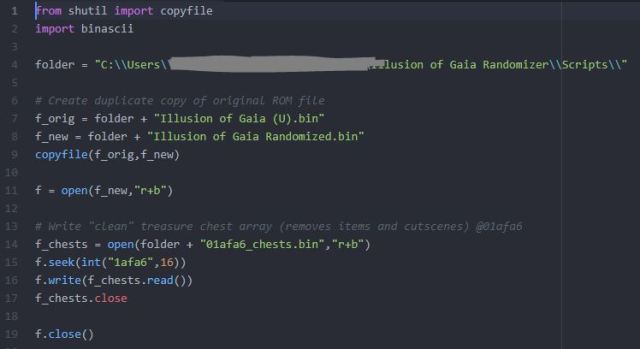
So my Python is a little rusty, but after an hour or so of fiddling with it I was able to write a functional program that changes a block of code in ROM.  Here’s my program that rewrites the treasure chest array to remove items and cutscene animations from all chests.  (I changed the file extensions of the ROM to .bin instead of .sfc for ease of reading in the bytes, this process works identically well if I switch the extensions back to .sfc.)

PythonChests.JPG

Chests_Orig.JPG

Chests_Clean.JPG

What’s going on here is this:  The treasure chest code is broken up into 4-byte sections.  The bytes indicate, respectively, the chest’s X location and Y location on the map, the chest’s contents (item code), and a byte that combines the chest number with the chest animation (0x80=play fanfare, 0x00=no fanfare).  A 0xFF byte denotes the end of a map, so if a map has several chests you’ll see a few 4-byte groups show up before another 0xFF.

So, by changing every third byte to 0x00, and making sure that no fourth byte is >0x80, this “empties” every chest in the game and removes all fanfares.  Later, the randomizer would go back in and fill in the third bytes with shuffled item codes.

Since this text-replacement mechanic is the bread and butter of the randomizer’s functionality, it was nice to so quickly be able to write functional code to perform this, without too many lines.  If anyone has any ideas on how I can make this program even more efficient, let me know — I’ll be using this same method over and over in the finished randomizer.

Design a site like this with WordPress.com
Get started